How do pay default work with the Advanced Earnings Matrix?
If you are using the Advanced Earnings Matrix and you are using Default Earning Rates because your earnings vary by pay defaults (set in File > Preferences > Payroll l > Advanced Earning Matrix), you can define specific information that will help you identify the information you want to track for the varying pay rate and have that information automatically display during time sheet entry by defining specifics in a pay default, for example an employee earns a different rate because they work at varying branches or perform varying jobs and you do not want to have to enter that information each time you enter time sheets. A pay default can track those specifics and display the specifics automatically during time sheet entry.
You can determine which columns display and the labels for the columns that display in Setup > Payroll Details > Default Earning Rates for pay defaults. To determine the label that will display for the column, select File > Preferences > Payroll > Pay Defaults, click the Database tab and then in Custom Label 1 - 5, enter the additional information that you want to track in a pay default, for example Branch Worked At or Job Performed. To display the column in the Default Earning Rates screen, select File > Preferences > Payroll > Advanced Earnings Matrix, click the Database tab, and under Pay Default, select the columns that you defined custom labels for. To add custom information that will display for a pay default when it is entered into time sheets, select Setup >Payroll Details > Pay Defaults and then click the Custom Fields tab. The labels that you added in Preferences will display and then you can enter the specific information for the pay default. The column labels and information specific to the pay default will display in Setup > Payroll Details > Default Earning Rates as read-only informational fields.
Example of how Default Earning Rates works with Pay Defaults:
An employee is normally paid $8.00 per hour, but if an employee works in Branch 1 and performs Job A, they receive $9.50 per hour, and if they work in Branch 1 and perform Job B, they receive $10.00 per hour.
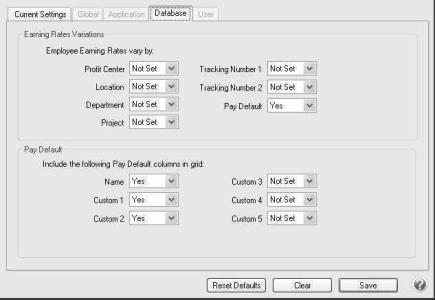
In File > Preferences > Payroll > Advanced Earnings Matrix:
- Under Earning Rate Variations, in the Pay Defaults box, select Yes.
- Under Pay Defaults, in the Name, Custom 1 and Custom 2 boxes, select Yes.
- Click Save.
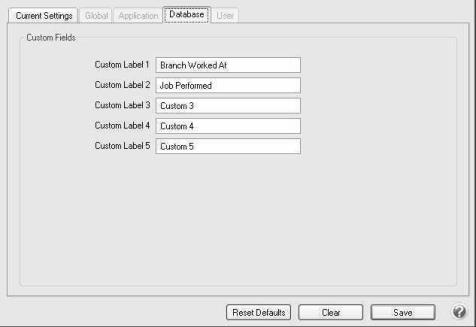
In File > Preferences > Payroll > Pay Defaults:
- Under Custom Fields, in the Custom Label 1 box, enter Branch Worked At.
- In the Custom Label 2 box, enter Job Performed.
- Click Save.
In the Setup > Payroll Details > Pay Defaults:
- Click New.
- Enter an Abbreviation for the pay default, for example B1JA.
- In the Name box, enter Branch 1 Job A.
- In the Earning Code box, select an earning code, for example Hourly Pay.
- Complete the General tab with other information about this pay default.
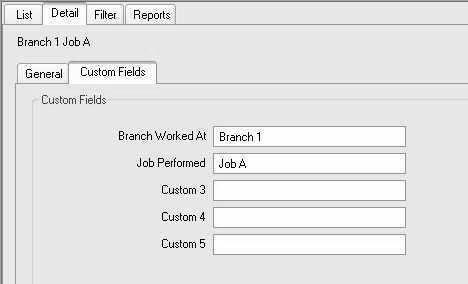
- Click the Custom Fields tab.
- In the Branch Worked At box, enter Branch 1.
- In the Job Performed box, enter A.
- Click Save.
In Setup > Payroll Details > Pay Defaults:
- Click New.
- Enter an Abbreviation for the pay default, for example B1JB.
- In the Name box, enter Branch1 JobB.
- In the Earning Code box, select an earning code, for example Hourly Pay.
- Complete the General tab with other information about this pay default.
- Click the Custom Fields tab.
- In the Branch Worked At box, enter Branch 1.
- In the Job Performed box, enter B.
- Click Save.
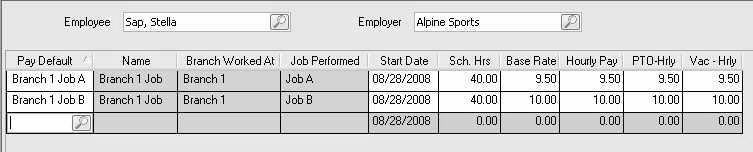
In Setup > Payroll Details > Default Earning Rates:
- In the Employee box, select an employee that is paid at varying rates for working in Branch 1 and performing Job A and B.
- In the Employer box, select the employer the varying rate is applicable to.
- In the Pay Default box, select B1JA.
- In the Start Date box, enter the date that the employee will start working in Branch 1 and performing Job A.
- In the Sch. Hrs. box, enter the expected number of hours the employee will work.
- In the Base Rate box, enter the base rate for the pay default, in this example, for B1JA enter $9.50 and for B1JB enter $10.00. The base rate will copy to all of the columns following the Base Rate column (these columns will vary by employee and will display each of the Hourly and Salary type earnings currently setup for the selected employee in alphabetical abbreviation order). If an earning code has a multiplier (for example, overtime may have a multiplier of 1.5), CenterPoint will calculate the base rate (base rate x the multiplier) for the appropriate earning code. The base rate can be used in the future when you give raises, type the new base rate in the Base Rate column and all of the earnings assigned to the default earning will automatically be increased.
- Click Save.
In Processes > Time Sheets
- Select an employee that is paid at varying rates for working in Branch 1 and performing Job A and B.
- In the Pay Default box, enter B1JA, and notice that CenterPoint automatically displays the $9.50 default earning rate. Enter the appropriate earning code and number of hours.
- On the next line, in the Pay Default box, enter B1JB, and notice that CenterPoint automatically displays the $10.00 default earning rate. Enter the appropriate earning code and number of hours.
- Click Save.
